Ingredients
Chicken Katsu (Panko fried Chicken Cutlets)
2 Boneless, Skinless Chicken Breasts
3 Tablespoons Mirin
Black Pepper
2-3 eggs, beaten in a large shallow bowl
2 cups Flour
2 teaspoons corn starch
Kikkoman Panko Breading
Vegetable Oil for frying
Jasmine Rice (I make it in my Cuisinart pressure cooker)
Thinly sliced cabbage
Thinly sliced green onions (scallions)
Sauces
3/4 cup Hoisin Sauce
1/4 cup Ketchup
3 Tablespoons Wan Ja Shan Hot Soy Sauce Glaze (or Soy Sauce Hot as we like to call it)
Mix together well to combine. You can mix this in a Zip-Lock baggie instead of a bowl. You will see why later! I will adjust the ingredients to taste. If it is too sweet I add a little more of the other ingredients and vice versa. It's up to you and your taste buds.
1 cup Mayonnaise (I use Best Foods mayonnaise. If you are on the East Coast that would be Hellman's Mayonnaise)
3 Tablespoons Rice Wine Vinegar
2 Tablespoons Sugar
Mix together well until the sugar is dissolved. If the mixture is too thick to drizzle add a touch more Rice Wine Vinegar. You can mix this in a Zip-Lock baggie instead of a bowl. You will see why later!
Prepare:
Slice your chicken on the diagonal into very thin cutlets. You will have some smaller than others, that's okay. You want hold the breast with and cut it so you are not slicing it in half, but across the grain. This will give you more "open" parts of the grain to absorb the marinade and it will be extra tender. Once you have everything sliced, put it in a bowl and add your Mirin. Season it heavily with black pepper. How much do you ask? Oh jeez. I always add quite a bit. If you are very sensitive to pepper, add a little more thank you think you should. If you are not, well be liberal with it! Let that sit for about 20 minutes in the refrigerator.
Mix your flour with your corn starch in a shallow container. Dip each piece of chicken into flour mixture. Then dip into the eggs. Then dip them into the Panko. Place them on a cookie sheet you have lined with parchment paper. (you can use tin foil, wax paper to substitute). Finish the process with all the chicken. Once you are done with all the chicken, cover them up with wrap (foil or plastic wrap) and refrigerate for 20-30-40 minutes). If you want to freeze these now and cook them another day, now is the time to do it! These freeze really well! When you look at the cost of chicken tenders or Panko breaded chicken in the store, it's so much more expensive! This is money saving and once you tasttttte this you will wonder why you ever bought it pre-made in the first place!
Now prepare to fry You will heat your oil in a deep frying pan, about an inch or so. Get your thermometer out and make sure you have your temperature at 350*. Do not crowd your pan as the temperature will get too low, do not add too much too fast or your temperature will get too low. Too low of a temperature will give you oily, soggy chicken. We want crispy, yummy chicken. So, keep it HOT in the pan! Keep checking your thermometer to see that it remains at about 350*! You want your chicken to be a nice golden brown. Once they are done on both sides, remove from the frying pan and place on a cookie sheet that you have several layers of paper towel for the oil to drain.
| I am going to take a minute to plug the Cuisinart Pressure cooker here. I got one as a gift from my husband Mark several years ago. It was literally ONE OF THE BEST kitchen gifts I have EVER received. Not only can I make rice in short order (6-7 minutes) but I an also make pulled pork in 25 minutes. Beef Stroganoff in 30, a roast in 90 minutes, artichokes in 7-9 minutes (!!!!! yeah I said that!). If you are thinking of pressure cookers of yesteryear and think of the fear that coursed through your veins as you watched the little top wobble--dread coursing through your body as you prayed for the best as you walked past it, this is something completelyyyyy different! I LOVE... this appliance. I mean LOVE. I told my best friend about it and she LOVES me more because of it. :) Truly a life saver, especially when you forget to take meat out the night before! So rice in the Cuisinart. Piece of cake. I typically do Jasmine or Basmatti. Tonight we'll do Jasmine. I will fill up the Cuisinart to the 4 cup line with water. I will add three cups of Jasmine rice. 1 Tablespoon of butter. You cannot omit the butter. It is required to keep the bubbling down in the pot. Besides that butter pressure cooked into the rice just tastes better anyway. You set your pressure cooker to high pressure cook for 6-7 minutes (I do 7) and then I begin to cook my meal. Simple as that. Takes about 3 minutes to do and I forget it until it is time to serve! |  If you are interested in the Cuisinart Pressure cooker check out my store. http://astore.amazon.com/marssty-20 It is one of the first things you will see when you enter the store. I literally would not want to go too long without one of these! I have even told my husband I want TWO of these. I would love one for back-up in case mine ever has a problem (I have had it years now with no issue) and to cook meat with when I make rice in the other! These are truly a time saver and blessing to any cook. And if you hate to cook, these save time in the kitchen you'd rather be spending elsewhere! |

Assemble Your Dinner:
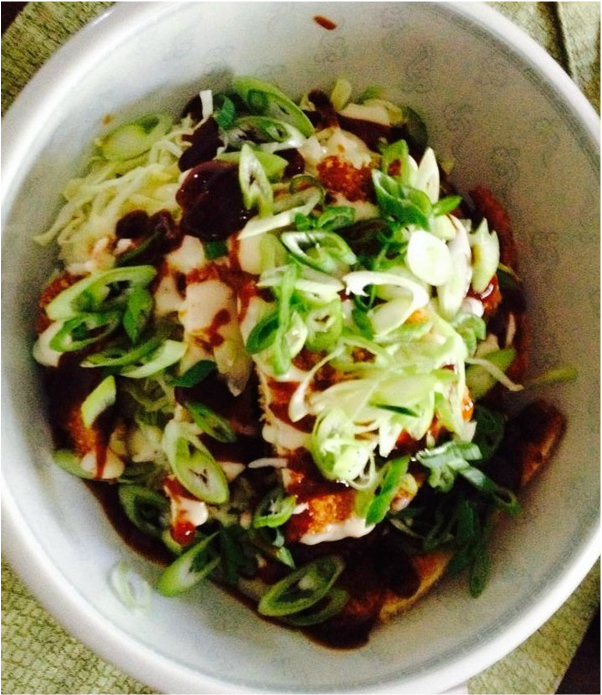
Prepare to wow your family and friends! Your Jasmine rice is done. You take a beautiful bowl. I have a nice set of dishes we bought in the Asian Market in Tacoma. I use those for this meal. I put about a cup of rice in the bottom of the bowl. Then sprinkle 1/2 a cup of thinly sliced cabbage over the rice. Take 2-3 of your panko breaded chicken cutlets and slice them into 1 thick slices and keeping their original shape place them on top of the rice and cabbage. Here is where I feel extra tricky. I take a scissor and cut a tiny corner off the sauce Zip-lock bags. I then squeeze gently and drizzle both the sauces in a criss-cross pattern all over the top of the chicken, rice and cabbage. Have fun with your sauce designs. Don't worry if you get a dollop. No one will truly care once they taste this. Trust me. Then sprinkle liberally with the green onions. To save your sauce I put a rubber band around the cut end and put it right into the fridge. This is great for a second meal the next day! You can also make the sandwiches I posted yesterday with the leftover chicken. Enjoy!
Prepare to wow your family and friends! Your Jasmine rice is done. You take a beautiful bowl. I have a nice set of dishes we bought in the Asian Market in Tacoma. I use those for this meal. I put about a cup of rice in the bottom of the bowl. Then sprinkle 1/2 a cup of thinly sliced cabbage over the rice. Take 2-3 of your panko breaded chicken cutlets and slice them into 1 thick slices and keeping their original shape place them on top of the rice and cabbage. Here is where I feel extra tricky. I take a scissor and cut a tiny corner off the sauce Zip-lock bags. I then squeeze gently and drizzle both the sauces in a criss-cross pattern all over the top of the chicken, rice and cabbage. Have fun with your sauce designs. Don't worry if you get a dollop. No one will truly care once they taste this. Trust me. Then sprinkle liberally with the green onions. To save your sauce I put a rubber band around the cut end and put it right into the fridge. This is great for a second meal the next day! You can also make the sandwiches I posted yesterday with the leftover chicken. Enjoy!
 RSS Feed
